
 on the ACORNS application
toolbar. A third way is to drag and drop; when you have an operating system folder open, select a picture;
next drag to the ACORNS application frame and release the mouse. The picture will insert into the lesson. If you
choose to insert using the first two of these approaches, a file chooser dialog will appear, which is similar to
chooser menus that other application programs use. Browse to the folder containing the pictures, and then click on the
desired picture. Note that if the folder contains lots of pictures; it sometimes takes a while for the list of files
to display.
on the ACORNS application
toolbar. A third way is to drag and drop; when you have an operating system folder open, select a picture;
next drag to the ACORNS application frame and release the mouse. The picture will insert into the lesson. If you
choose to insert using the first two of these approaches, a file chooser dialog will appear, which is similar to
chooser menus that other application programs use. Browse to the folder containing the pictures, and then click on the
desired picture. Note that if the folder contains lots of pictures; it sometimes takes a while for the list of files
to display.
 ).
).
|
 | When you click the help button, this page displays. The title you gave to this lesson when it was created appears to the right of the help button |
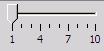 | All ACORNS lessons can have multiple layers; each layer has an entirely separate list of acorns and links. This feature can be useful to create lessons with multiple dialects. By switching between layers, the student can learn each dialects using the same lesson. This option can also be used to assign more difficult lessons to the higher layers. The slider on the control bar enables you to set up a lesson with multiple layers. Simply click on the slider to move to the desired layer. The layer numbers are numbered as shown on the picture to the left. |
 | The rotate button allows you to rotate the selected picture in ninety degree increments. This feature accommodates pictures taken with the camera rotated. Click to select the picture, and then click the rotate button. |
|
Picture and sound lessons allow you to scale images from twenty percent to five hundred percent of their
original size. This is especially useful to fit the image to the full screen size when the lesson executes.
ACORNS preserves scaled images across file open and save operations, so they are perminent unless you wish to
change them. To scale an image during lesson setup, click on the combo box menu and choose one of the options. You can also type a scale factor of your choice if none of the menu options are appropriate. | |
 |
In some cases you might want the acorns and links to be in the same place in the different layers in your lesson. The Copy
and Paste Acorns buttons allows you to copy acorns from one layer and then paste them to another. Use these buttons
as follows: (1) Move the slider to the layer containing the acorns and links that you want to copy; (2) Click the copy button
(the one shown on the left); (3) Move the slider to the layer where you want to paste the acorns; and (4) Click the paste
button (the one on the right). Your acorns will appear in the new layer. |
 |
To create a link within the picture, first make sure the button with the 'link' icon is pressed. Initially, the acorn icon
appears depressed and the chain link icon is not. Click on the icon that looks like a chain link so that it will display
depressed. You are then ready to make links to other lessons.
Click anywhere on the picture where the link should appear. ACORNS will then display a dialog box where you enter the name of the lesson that you want to link to. The name field is one of the header fields that you fill in when you create a new lesson. (You can modify it later if you didn't.) It shows in the lesson display area on the left of the ACORNS application frame. After you click OK to the link dialog, a chain link icon will appear on the picture. As with acorns, you can drag it to reposition its spot, or drag it off the application frame should you want to remove it. If an illegal name is entered, the link will appear when the lesson executes but will not be operational. When you are finished adding links, it is a good idea to click on the acorn icon on the secondary toolbar. This will cause the acorn icon to become depressed; you are again ready to add more acorns. |
 | The link button allows you to connect this lesson with another lesson in the file. Clicking on this button causes a dialog window to appear. Enter the name of the lesson you want to link to. The name field is one of the header fields that you fill in when you create a lesson. (You can modify it later if you didn't.) It shows in the lesson display area on the left of the ACORNS application frame. After you click OK to the link dialog, the name of the linked lesson will show in blue on the secondary toolbar. |