Video Clips
The ability to extract video clips from a movie is a useful tool for creating lessons that capture movement. For example, you
can use a smart phone or inexpensive camcorder to record someone sitting down, standing up, moving arms, or other actions. Then
you can extract clips from the recorded video and save them into animated gif files which can be used in a variety of ACORNS
lessons.
You invoke the facility to extract video clips from a movie by clicking on the icon  . This facility
can also be invoked by clicking on the edit drop down menu, and then on the Movie to Animation selection. After invoking this
option, a file open dialog will appear enabling you will browse to select a movie. If you have a folder open containing a list of
video files, you can also depress the mouse on the one you want and drag to the dialog panel, drop, and click the OPEN button. This
can be an easier approach than navigating to the desired folder using the dialog interface. Once you select your video file, a
frame opens that is similar to the one shown in the picture below.
. This facility
can also be invoked by clicking on the edit drop down menu, and then on the Movie to Animation selection. After invoking this
option, a file open dialog will appear enabling you will browse to select a movie. If you have a folder open containing a list of
video files, you can also depress the mouse on the one you want and drag to the dialog panel, drop, and click the OPEN button. This
can be an easier approach than navigating to the desired folder using the dialog interface. Once you select your video file, a
frame opens that is similar to the one shown in the picture below.
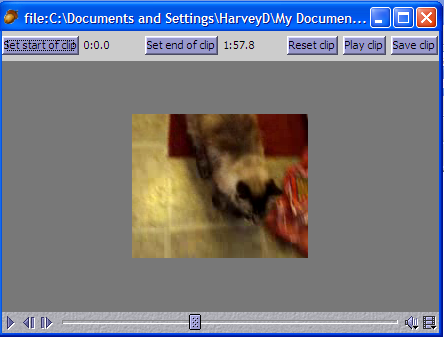
The control bar shown on the bottom of the picture enables you to play the video. This bar works in a similar way to many
media player programs. The left button, is to play and pause the video. Next, to the right, are the rewind and fast forward buttons.
Each click of these buttons will adjust the current position in the video (forward or back) by a third of a second. The progress
bar is in the center of the control bar; it shows the relative current position in the video (represented by the square in the
middle). After pausing, you can click on this bar at the desired place to alter the current position. You can also drag the square
in the progress bar forward or back to do the same thing. The mute button to the right of the progress bar can be used to toggle
the sound on and off. Finally, clicking on the information button on the right of the control bar will display information about
the loaded video.
If you right click (cmd click on Macs) over the video, a popup menu
displays. This menu allows you to zoom the movie display section
in or out.
There are five buttons on the top of the panel. These buttons provide capabilities that allow you to extract a clip from the
video and save it into an animated gif picture on disk. As stated above, the animated picture can then be used in a variety of
ACORNS language lessons (ex: multiple choice). To perform this function, the steps are: (1) position to the start of the clip,
(2) Click the 'Set start of clip' button,(3) position to the end of the clip, (4) Click the 'Set end of clip' button,
(5) Click on the 'Play clip' button to play back the video clip and verify that you have the right settings, and (6) Click
'Save clip' to select a file name and folder and save the selected clip on disk. You can repeat this procedure to extract
additional clips from the same video.
Note the numbers shown to the right of the 'Set start' and 'Set end
buttons. These show the time position that you selected in
minutes:seconds from the start of the video. The reset button sets
the start and end positions to encompass the entire video.