Recording and Maintaining Audio

Various lesson types allow you to record audio during the setup process. For example, if you are creating a lesson with multiple pictures, click on a selected picture. When creating picture and sound lessons, click anywhere on a picture to record an audo that relates to that position.

When you choose to record a sound, a dialog window displays. We describe how to interact with this window in this section.

Adding New Sounds

If this is the first sound you are adding, the dialog box shown above will appear to allow you to enter text for sound translation and native spelling. If this is not the first sound, refer to Maintaining Sounds below.

Note that some lessons will display an expanded version of the dialog shown above. When setting up these lessons, there will be a text area for entering additional descriptive information about the audio. If you see this in your dialog, you can either use it or ignore it. (the extra information is optional but can be useful to enhance the student's learning experience.)

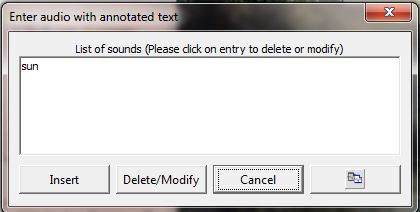
The dialog box shows four buttons. If you want to use a pre-recorded sound clip, click on the browse button and use the file chooser dialog to find and select the file containing the audio. Double click on the file in the file chooser window to retrieve the sound clip. ACORNS remembers the folder holding the last sound clip that you retrieved. This feature avoids unnecessary future traversals through folders to locate sound files.

There is also a simpler way to accomplish importing pre-recorded sound clips if you have a folder open containing audio files. Instead of clicking the browse button, depress the mouse on the audio file desired, drag over the dialog panel, and release the mouse when you see a small white rectangle appear under the mouse. This will import the audio into your lesson. You can then click the play button (the icon with a sideways black arrow) to hear the audio that was loaded.

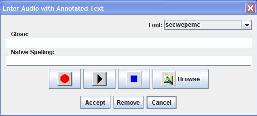
If you wish to record your own sound clip, first make sure that you have a microphone setup and ready. Then click on the record button (the one with the red circle) and begin speaking with the microphone at the side of your mouth. A microphone with a headphone generally works better because there less interference from background noise. When you are done, click the stop button (the one with the blue square).

To hear the sound clip, simply click the play button (the one with the sideways black arrow).

The font drop down meny allows you to pick another font known to ACORNS. This font will be used to display the indigenous text. Note that in most cases, you would want to pick a default font for indigenous text. Then you won't have to bother with this drop down selection. For more information, please refer to the ACORNS help pages that describe how to add and use special fonts.

Maintaining Sounds

If there are already sounds recorded, you will see a list of gloss translations displaying along with an insert and a 'Delete/Modify' button (see the picture above). If you are adding a new sound to this picture, click on the insert button and follow the instructions that we provided above.

To modify or remove a sound, click to select one of the entries displayed in the list and then click the Modify/Delete button. The dialog shown at the top then shows with previously entered data. You can modify the gloss or native text, change fonts, or play/re-record the audio. Click accept when you are done, or cancel if you change your mind and want to abort the operation

To delete an entry after you click on the Delete/Modify button, there is Remove button available. Click the remove button to remove the audio. Next click accept for ACORNS to record your changes. Otherwise, click cancel to abort the operation.

Sometimes you might want to reuse an audio dialog. You can copy and paste individual audio dialogs. The audio input dialog screen above contains an icon button for copying on the bottom right. Click this button to copy the entered audio and text to a system clip board. Once copied, the next time you open the audio dialog screen, a paste button appears. Use this to paste, and therefore reuse your audio, gloss, and indigenous text input in another context.

Note that you can have any number of sounds recorded and attached to a picture or picture position. Play options will randomly choose which one plays.