To execute a lesson, there must be at least one sound clip attached to each picture. You are not limited to one sound
clip, however. Any number of sound clips can be attached. First select a picture by clicking on it. This will cause its border
to turn red. A sound dialog will then appear which will enable you to attach audio to a picture, or modify what you did
previously. For more information, there is a help web-page called
Recording and Maintaining Audio. that describes this procedure in more detail.
 | When you click the help button, this page displays.
The title you gave to this lesson when it was created appears to the right of the help button |
 | This control enables you to
insert a background picture to the lesson. This gives you more control as to how the lesson looks when
it executes. |
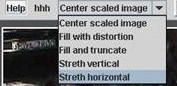 | The drop down menu shows ways to scale a selected picture to its display area.
There are five ways to scale pictures.
- Scale and center sizes the picture to the display area and centers it. There is no
distortion, but part of the display area can be blank.
- Fill with distortion stretches the picture to the display area. This option fills
the entire display area, but the picture can appear distorted.
- Fill and truncate. This option fills the entire display area without distortion,
but crops a piece out of the middle.
- Stretch vertical. This option stretches the picture vertically but leaves the
width as is.
- Stretch horizontal. This option stretches the picture horizontally but leaves the
height as is.
|
 | All ACORNS lessons can have multiple layers. This
feature can be useful to create lessons with multiple dialects. By switching between
layers, the student can learn each dialects using the same lesson. This option can also be used to
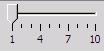
assign more difficult lessons to the higher layers. The slider
on the control bar enables you to set up a lesson with multiple layers. Simply click
on the slider to move to the desired layer. The layer numbers are numbered as shown on the picture
to the left. |
 | These controls allow you to control
background and text colors that are used when the lesson executes. If you click either of the two left buttons,
you will see a color palette display; simply click the color you want and then click OK. The button with the
capital A is for the text color and the one with the three boxes and hand is for the background color. |
 | The rotate button allows
you to rotate the selected picture in ninety degree increments. This feature accommodates
pictures taken with the camera rotated. Click to select the picture, and then click the rotate
button. |
 |
The link button allows you to connect this lesson with another lesson in the file. Clicking on
this button causes a dialog window to appear.
Enter the name of the lesson you want to link to. The name field is one of the header fields
that you fill in when you create a lesson. (You can modify it later if you didn't.) It shows in the lesson display
area on the left of the ACORNS application frame. After you click OK to the link dialog, the name of the
linked lesson will show in blue on the secondary toolbar. |

 ).
).