 on the ACORNS a
pplication toolbar. A third way is to drag and drop; when you have an operating system folder open, select a picture;
next drag to the ACORNS application frame and release the mouse at a spot when you see a small white rectangle appear by
the mouse. The picture will insert into the lesson. If you
choose to insert using the first two of these approaches, a file chooser dialog will appear, which is similar to
chooser menus that other application programs use. Browse to the folder containing the pictures, and then click on the
desired picture. Note that if the folder contains lots of pictures; it sometimes takes a while for the list of files
to display. After you insert your picture, you will see it show in the background of the sound panel.
on the ACORNS a
pplication toolbar. A third way is to drag and drop; when you have an operating system folder open, select a picture;
next drag to the ACORNS application frame and release the mouse at a spot when you see a small white rectangle appear by
the mouse. The picture will insert into the lesson. If you
choose to insert using the first two of these approaches, a file chooser dialog will appear, which is similar to
chooser menus that other application programs use. Browse to the folder containing the pictures, and then click on the
desired picture. Note that if the folder contains lots of pictures; it sometimes takes a while for the list of files
to display. After you insert your picture, you will see it show in the background of the sound panel.
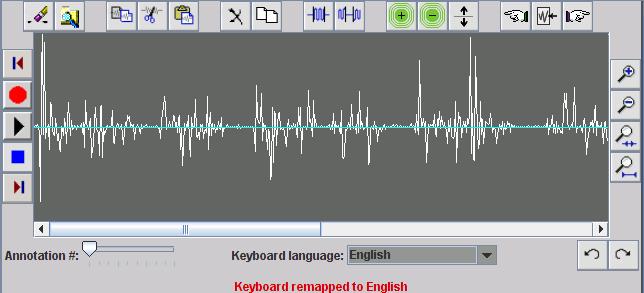
In the center of the display appears a sound Panel, as we show above. Around this panel are a series of buttons and controls. For example, there is a slider and a drop down menu on the bottom of the panel. The slider is used to select the layer that you want to work with. Story Book lessons support ten layers of translation of your story. The drop down menu lets you pick an appropriate font for displaying one of the layers of translation.
 ) you
will hear the audio corresponding to the section of the sound wave that you select.
) you
will hear the audio corresponding to the section of the sound wave that you select.
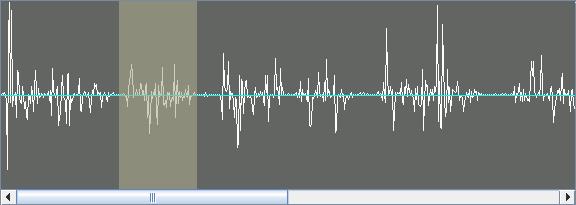
The picture below shows a portion of the panel that is selected. Notice that the highlighted area is shaded. If you click the mouse again the selection is released.
If you make a mistake, error messages display in red at the bottom of the panel. Sometimes ACORNS acknowledges what it is doing by displaying a message in this area. The Error page describes the kind of messages that can display.
While you are setting up a Story Book lesson, there are a series of buttons to assist. As you move your mouse over the various buttons, you will see a short description of the component. This can help if you forget what a particular component does. We have help pages that describe the operation of of the various buttons. You can click on the image links below to learn how these buttons and controls work.
| Recording Buttons |


|
| File Control Buttons |


|
| Edit Buttons |


|
| Recording Speed and Volume Control Buttons |


|
| Zoom Control Buttons |


|
| Selection Control Buttons |


|
| Annotation Controls |


|
| Undo and Redo |


|
 ).
).
 |
 | When you click the help button, this page displays. The title you gave to this lesson when it was created appears to the right of the help button |
 | All ACORNS lessons can have multiple layers; each Story Book lesson layer has separate translation. This feature can be useful to create lessons with multiple dialects. By switching between layers, the student can learn each dialects using the same lesson. The slider on the control bar enables you to set up a lesson with multiple layers. Simply click on the slider to move to the desired layer. The layer numbers are numbered as shown on the picture to the left. |
| This control enables you to insert a background picture to the lesson. This gives you more control as to how the lesson looks when it executes. |
|
This option allows you to scale images from twenty percent to five hundred percent of their
original size. This is especially useful to fit the image to the full screen size when the lesson executes.
ACORNS preserves scaled images across file open and save operations, so they are perminent unless you wish to
change them. To scale an image during lesson setup, click on the combo box menu and choose one of the options. You can also type a scale factor of your choice if none of the menu options are appropriate. | |
 | These controls allow you to control background and text colors that are used when the lesson executes. If you click either of the two left buttons, you will see a color palette display; simply click the color you want and then click OK. The button with the capital A is for the text color and the one with the three boxes and hand is for the background color. |
 | The font size drop down menu enables you to choose how big the text is when it displays while the lesson executes. Either pick a size from the selection or enter your own. |
| The justify buttons enable you to ether center or left justify the text while the story plays. By default the text is left justified. When you click on one of these buttons it will display depressed to indicate that the option is active. The justification applies to a active lesson layer. | |
 | The link button allows you to connect this lesson with another lesson in the file. Clicking on this button causes a dialog window to appear. Enter the name of the lesson you want to link to. The name field is one of the header fields that you fill in when you create a lesson. (You can modify it later if you didn't.) It shows in the lesson display area on the left of the ACORNS application frame. After you click OK to the link dialog, the name of the linked lesson will show in blue on the secondary toolbar. |